
Creación y manipulación de Azure Tables Storage.
En este tutorial vamos a aprender a crear una cuenta de almacenamiento con Portal de Azure (también podremos usarlo en entorno local con la máquina virtual de Azure) en el cual vamos a crear una tabla y a manejar sus datos (listar, crear, modificar y eliminar).
Primeros pasos
Con cuenta Azure
Primero accedemos al portal de Azure. Una vez hayamos iniciado sesión con nuestra cuenta, en el menú lateral, seleccionaremos “cuentas de almacenamiento”.

Una vez dentro tendremos que añadir una nueva cuenta de almacenamiento.

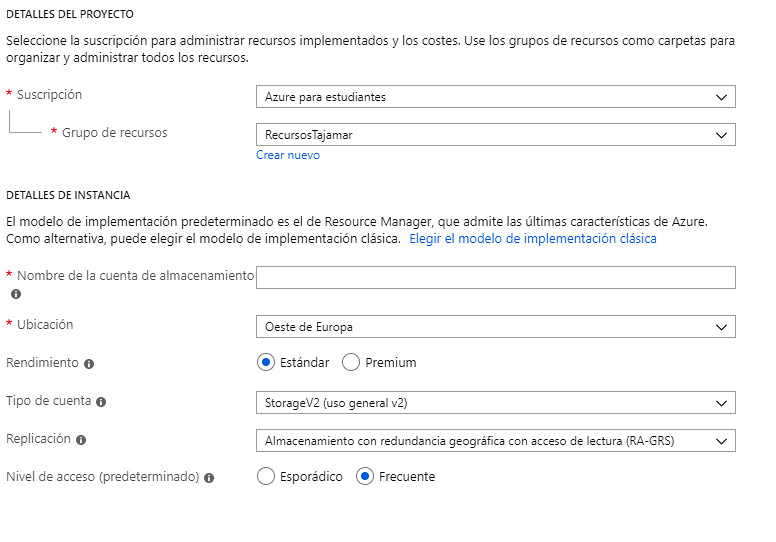
Luego necesitaremos rellenar los datos necesarios y pulsamos en «Crear«.
Una vez creada la cuenta de almacenamiento, pulsaremos sobre ella y nos dirigiremos al apartado de “claves de acceso”, en el cual, podremos visualizar la clave de acceso que necesitaremos para establecer la conexión entre nuestra aplicación y la cuenta de almacenamiento.
<add key="StorageConnectionString" value="DefaultEndpointsProtocol=https;AccountName=account-name;AccountKey=account-key" />Recuerda que necesitaremos sustituir los parámetros por nuestra clave correspondiente.
Sin cuenta Azure
Abriremos el emulador de Azure, el cual deberá estar iniciado cuando estemos usando la aplicación.
Luego,cuando sea necesario, deberemos añadir a nuestro proyecto el siguiente código:
<add key="StorageConnectionString" value="UseDevelopmentStorage=true"/>Con esto ya estaríamos listos para comenzar a desarrollar nuestra aplicación MVC.
Creación de la aplicación
Iniciación
Abrimos Visual Studios y creamos un nuevo proyecto ASP.NET MVC, al cual llamaremos “EjemploTableStorage”.
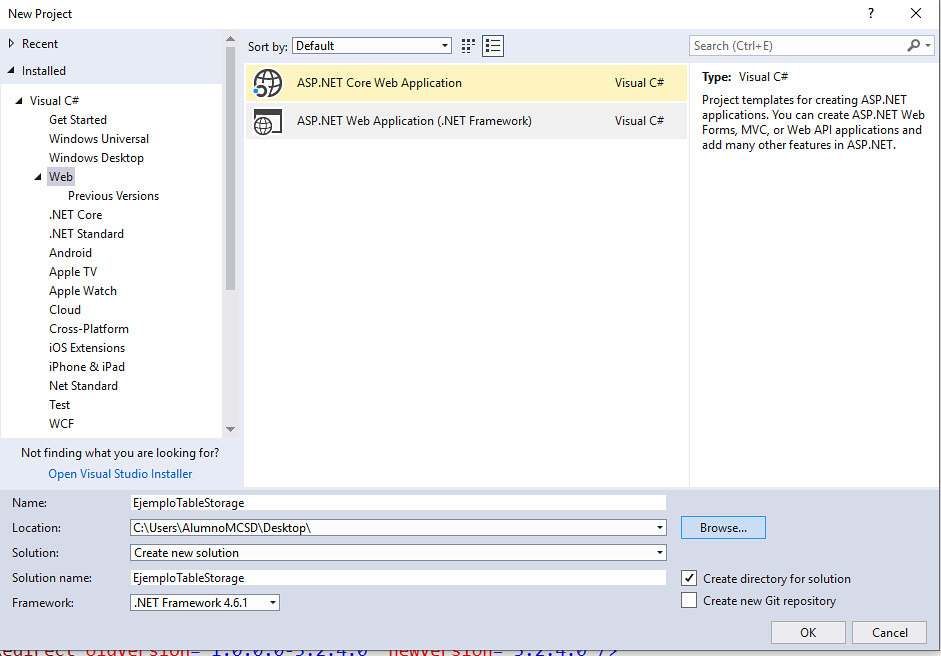
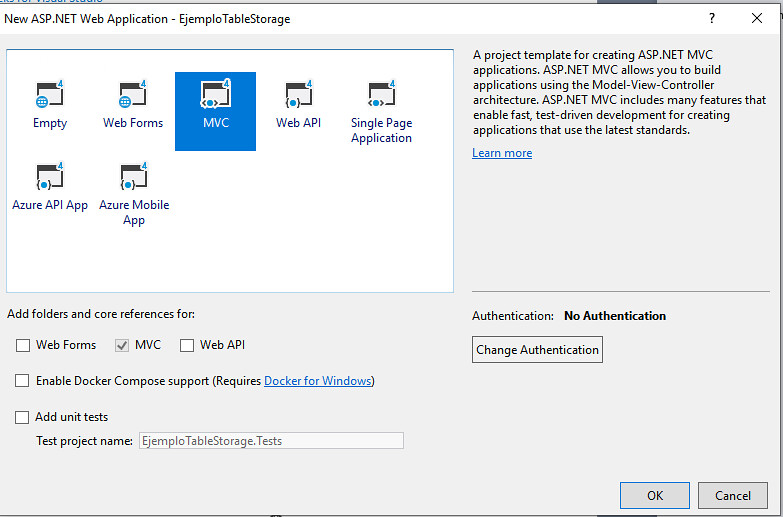
También necesitaremos seleccionar el apartado «MVC» para que nos cree un proyecto predeterminado (Para que nos resulte más fácil la creación de la aplicación).
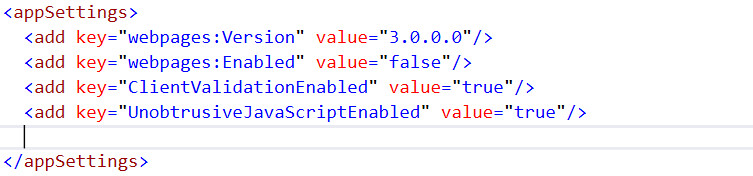
Lo primero que vamos a cambiar es el archivo “Web.config” para añadir en «appSettings» nuestra cadena de conexión que nos proporciona Azure (O en su defecto la conexión predeterminada del emulador).

Ahora es cuando necesitamos recuperar el fragmento de código que hemos obtenido anteriormente, y lo pegaremos.
También deberemos incluir los paquetes necesarios para el correcto funcionamiento de la aplicación (Clic derecho sobre nuestro proyecto y seleccionamos «Manage NuGet Packages«).
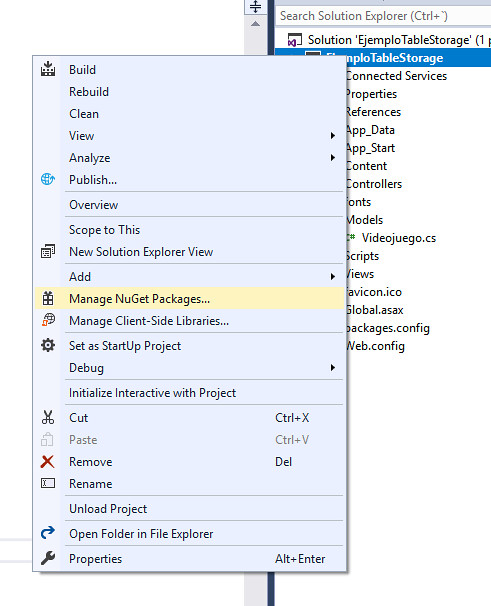
E instalaremos los siguientes paquetes:


Modelo
Ahora en la carpeta “Models” añadiremos una clase llamada “Videojuego.cs” (Clic derecho sobre la carpeta y pulsamos en “añadir” y pulsamos en “clase”).
Una vez creada lo primero que haremos es indicar que la clase herede de “TableEntity”. También necesitaremos añadimos el «using«:
using Microsoft.WindowsAzure.Storage.Table;y la herencia:
public class Videojuego : TableEntityUna vez hecho esto, podremos crear nuestra clase con los atributos que necesitemos. Tiene que quedar algo parecido al siguiente código:
        public Videojuego() { }

        private String _Estudio { get; set; }
        public String Estudio
        {
            get
            {
                return this._Estudio;
            }
            set
            {
                this.PartitionKey = value;
                this._Estudio = value;
            }
        }
        private String _IdVideojuego { get; set; }
        public String IdVideojuego
        {
            get
            {
                return this._IdVideojuego;
            }
            set
            {
                this.RowKey = value;
                this._IdVideojuego = value;
            }
        }
        public String Nombre { get; set; }
        public String Creador { get; set; }
        public String Descripcion { get; set; }
        public DateTime FechaLanzamiento { get; set; }
        public int Precio { get; set; }
        public String Categorias { get; set; }
Repositorio
Ahora tendremos que crear a nivel de proyecto una carpeta llamada “Repositories” y añadiremos una clase llamada “RepositoryVideojuegos.cs”.
Una vez creado el archivo, no hay que olvidarse de añadir los «usings» necesarios:
using Microsoft.Azure;
using Microsoft.WindowsAzure.Storage;
using Microsoft.WindowsAzure.Storage.Table;
Ahora añadiremos el constructor, el cual se encarga de instanciar la conexión con la cuenta de almacenamiento.
  CloudTable tabla;
  public RepositoryVideojuegos()
  {
    String keys =
    CloudConfigurationManager.GetSetting("StorageConnectionString");
    //Nombre de tu conexión.
    CloudStorageAccount account = CloudStorageAccount.Parse(keys);
    CloudTableClient client = account.CreateCloudTableClient();
    this.tabla = client.GetTableReference("videojuegos");
    this.tabla.CreateIfNotExists();
  }
También añadiremos el resto de métodos encargados de realizar las principales funciones de la aplicación.
  public void CrearVideojuego(String estudio, String idvideojuego
   ,String nombre, String creador,String descripcion,DateTime fecha
   ,int precio,String categorias)
   {
     Videojuego videojuego = new Videojuego();
            videojuego.Estudio = estudio;
            videojuego.IdVideojuego = idvideojuego;
            videojuego.Nombre = nombre;
            videojuego.Creador = creador;
            videojuego.Descripcion = descripcion;
            videojuego.FechaLanzamiento = fecha;
            videojuego.Precio = precio;
            videojuego.Categorias = categorias;
     TableOperation operation = TableOperation.Insert(videojuego);
     this.tabla.Execute(operation);
   }

public Videojuego BuscarVideojuego(String partitionkey,String rowkey)
 {
   TableOperation operation = TableOperation.Retrieve<Videojuego>
   (partitionkey, rowkey);
   TableResult result = this.tabla.Execute(operation);
   if (result.Result == null)
   {
     return null;
   }
    else
   {
       Videojuego videojuego = result.Result as Videojuego;
       return videojuego;
   }
 }

public void ModificarVideojuego(String estudio, String idvideojuego
  , String nombre, String creador, String descripcion, DateTime fecha
  ,int precio, String categorias)
{
  Videojuego videojuego = this.BuscarVideojuego(estudio, idvideojuego);
  if (videojuego != null)
    {
            videojuego.Nombre = nombre;
            videojuego.Creador = creador;
           videojuego.Descripcion = descripcion;
            videojuego.FechaLanzamiento = fecha;
           videojuego.Precio = precio;
          videojuego.Categorias = categorias;
         TableOperation operation =
       TableOperation.Replace(videojuego);
        this.tabla.Execute(operation);
    }
  }

  public void EliminarVideojuego(String partitionkey, String rowkey)
  {
    Videojuego videojuego = this.BuscarVideojuego(partitionkey,rowkey);
    if (videojuego != null)
    {
        TableOperation operation = TableOperation.Delete(videojuego);
        this.tabla.Execute(operation);
     }
  }


  public List<Videojuego> MostrarVideojuegos()
  {
        TableQuery<Videojuego> query = new TableQuery<Videojuego();
        List<Videojuego> videojuegos =
        this.tabla.ExecuteQuery(query).ToList();
        return videojuegos;
  }
Controlador
Necesitaremos un controlador para que la aplicación pueda acceder al repositorio y que este, pueda crear y mostrar los videojuegos. Dentro de la carpeta “Controllers” añadiremos un controlador MVC Empty (Vacío) al cual llamaremos “VideojuegosController”.
Tendremos que crear un método “Index” encargado de mostrar los datos y otros métodos llamados “Create»,»Delete»,»Edit»,»Details” que deberá dividirse en dos (Get y Post) a excepción de «Delete» y «Details»:
    public class VideojuegosController : Controller
    {
        RepositoryVideojuegos repo;
        public VideojuegosController()
        {
            this.repo = new RepositoryVideojuegos();
        }

        public ActionResult Index()
        {
            List<Videojuego> videojuegos = repo.MostrarVideojuegos();
            return View(videojuegos);
        }

        public ActionResult Create()
        {
            return View();
        }

        [HttpPost]
        public ActionResult Create(Videojuego videojuego)
        {
            repo.CrearVideojuego(videojuego.Estudio, videojuego.IdVideojuego
            ,videojuego.Nombre, videojuego.Creador, videojuego.Descripcion,
            videojuego.FechaLanzamiento, videojuego.Precio, videojuego.Categorias);
            return RedirectToAction("Index");
        }

        public ActionResult Details(String partition, String row)
        {
            Videojuego videojuego = repo.BuscarVideojuego(partition, row);
            return View(videojuego);
        }

        public ActionResult Edit(String partition, String row)
        {
            Videojuego videojuego = repo.BuscarVideojuego(partition, row);
            return View(videojuego);
        }

        [HttpPost]
        public ActionResult Edit(Videojuego videojuego)
        {
            repo.ModificarVideojuego(videojuego.Estudio, videojuego.IdVideojuego
            , videojuego.Nombre, videojuego.Creador, videojuego.Descripcion,
            videojuego.FechaLanzamiento, videojuego.Precio, videojuego.Categorias);
            return RedirectToAction("Index");
        }

        public ActionResult Delete(String partition, String row)
        {
            repo.EliminarVideojuego(partition, row);
            return RedirectToAction("Index");

        }
Vistas
Ahora solo nos quedan las vistas, las cuales las crearemos con “scaffolding” para que nos facilite la creación (clic derecho sobre el nombre del método y pulsando en “crear vista” y marcaremos lo siguiente).
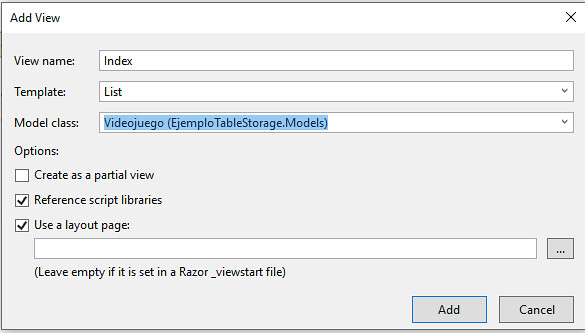
–NOTA IMPORTANTE–
El campo “Template” deberá ser :
- Create para crear videojuegos.
- Details para mostrar detalles de los videojuegos.
- Delete para eliminar los videojuegos.
- Edit para modificar los videojuegos .
- List para mostrar los videojuegos.
También deberemos eliminar los datos que no queremos mostrar hacer más ágil el proceso de creación y edición.
Las vistas tendrán que tener un aspecto similar a estos:
Index
@model IEnumerable<EjemploTableStorage.Models.Videojuego>

@{
    ViewBag.Title = "Index";
}

<h2>Index</h2>

<p>
    @Html.ActionLink("Añadir Videojuego", "Create")
</p>
@if (Model != null || Model.Count() > 0)
{
    <table class="table">
        <tr>
            <th>
                @Html.DisplayNameFor(model => model.Estudio)
            </th>
            <th>
                @Html.DisplayNameFor(model => model.IdVideojuego)
            </th>
            <th>
                @Html.DisplayNameFor(model => model.Nombre)
            </th>
            <th></th>
        </tr>

        @foreach (var item in Model)
        {
            <tr>
                <td>
                    @Html.DisplayFor(modelItem => item.Estudio)
                </td>
                <td>
                    @Html.DisplayFor(modelItem => item.IdVideojuego)
                </td>
                <td>
                    @Html.DisplayFor(modelItem => item.Nombre)
                </td>
                <td>
                    @Html.ActionLink("Editar", "Edit", new { partition = item.PartitionKey, row = item.RowKey }) |
                    @Html.ActionLink("Detalles", "Details", new { partition = item.PartitionKey, row = item.RowKey }) |
                    @Html.ActionLink("Eliminar", "Delete", new { partition = item.PartitionKey, row = item.RowKey })
                </td>
            </tr>
        }

    </table>

}
else{
    <h4>No hay Videojuegos...</h4>
}
Create
@model EjemploTableStorage.Models.Videojuego

@{
    ViewBag.Title = "Create";
}

<h2>Create</h2>


@using (Html.BeginForm())
{
    @Html.AntiForgeryToken()

    <div class="form-horizontal">
        <h4>Videojuego</h4>
        <hr />
        @Html.ValidationSummary(true, "", new { @class = "text-danger" })
        <div class="form-group">
            @Html.LabelFor(model => model.Estudio, htmlAttributes: new { @class = "control-label col-md-2" })
            <div class="col-md-10">
                @Html.EditorFor(model => model.Estudio, new { htmlAttributes = new { @class = "form-control" } })
                @Html.ValidationMessageFor(model => model.Estudio, "", new { @class = "text-danger" })
            </div>
        </div>

        <div class="form-group">
            @Html.LabelFor(model => model.IdVideojuego, htmlAttributes: new { @class = "control-label col-md-2" })
            <div class="col-md-10">
                @Html.EditorFor(model => model.IdVideojuego, new { htmlAttributes = new { @class = "form-control" } })
                @Html.ValidationMessageFor(model => model.IdVideojuego, "", new { @class = "text-danger" })
            </div>
        </div>

        <div class="form-group">
            @Html.LabelFor(model => model.Nombre, htmlAttributes: new { @class = "control-label col-md-2" })
            <div class="col-md-10">
                @Html.EditorFor(model => model.Nombre, new { htmlAttributes = new { @class = "form-control" } })
                @Html.ValidationMessageFor(model => model.Nombre, "", new { @class = "text-danger" })
            </div>
        </div>

        <div class="form-group">
            @Html.LabelFor(model => model.Creador, htmlAttributes: new { @class = "control-label col-md-2" })
            <div class="col-md-10">
                @Html.EditorFor(model => model.Creador, new { htmlAttributes = new { @class = "form-control" } })
                @Html.ValidationMessageFor(model => model.Creador, "", new { @class = "text-danger" })
            </div>
        </div>

        <div class="form-group">
            @Html.LabelFor(model => model.Descripcion, htmlAttributes: new { @class = "control-label col-md-2" })
            <div class="col-md-10">
                @Html.EditorFor(model => model.Descripcion, new { htmlAttributes = new { @class = "form-control" } })
                @Html.ValidationMessageFor(model => model.Descripcion, "", new { @class = "text-danger" })
            </div>
        </div>

        <div class="form-group">
            @Html.LabelFor(model => model.FechaLanzamiento, htmlAttributes: new { @class = "control-label col-md-2" })
            <div class="col-md-10">
                @Html.EditorFor(model => model.FechaLanzamiento, new { htmlAttributes = new { @class = "form-control" } })
                @Html.ValidationMessageFor(model => model.FechaLanzamiento, "", new { @class = "text-danger" })
            </div>
        </div>

        <div class="form-group">
            @Html.LabelFor(model => model.Precio, htmlAttributes: new { @class = "control-label col-md-2" })
            <div class="col-md-10">
                @Html.EditorFor(model => model.Precio, new { htmlAttributes = new { @class = "form-control" } })
                @Html.ValidationMessageFor(model => model.Precio, "", new { @class = "text-danger" })
            </div>
        </div>

        <div class="form-group">
            @Html.LabelFor(model => model.Categorias, htmlAttributes: new { @class = "control-label col-md-2" })
            <div class="col-md-10">
                @Html.EditorFor(model => model.Categorias, new { htmlAttributes = new { @class = "form-control" } })
                @Html.ValidationMessageFor(model => model.Categorias, "", new { @class = "text-danger" })
            </div>
        </div>

        <div class="form-group">
            <div class="col-md-offset-2 col-md-10">
                <input type="submit" value="Create" class="btn btn-default" />
            </div>
        </div>
    </div>
}

<div>
    @Html.ActionLink("Volver", "Index")
</div>

@section Scripts {
    @Scripts.Render("~/bundles/jqueryval")
}
Details
@model EjemploTableStorage.Models.Videojuego

@{
    ViewBag.Title = "Details";
}

<h2>Details</h2>

<div>
    <h4>Videojuego</h4>
    <hr />
    <dl class="dl-horizontal">
        <dt>
            @Html.DisplayNameFor(model => model.Estudio)
        </dt>

        <dd>
            @Html.DisplayFor(model => model.Estudio)
        </dd>

        <dt>
            @Html.DisplayNameFor(model => model.IdVideojuego)
        </dt>

        <dd>
            @Html.DisplayFor(model => model.IdVideojuego)
        </dd>

        <dt>
            @Html.DisplayNameFor(model => model.Nombre)
        </dt>

        <dd>
            @Html.DisplayFor(model => model.Nombre)
        </dd>

        <dt>
            @Html.DisplayNameFor(model => model.Creador)
        </dt>

        <dd>
            @Html.DisplayFor(model => model.Creador)
        </dd>

        <dt>
            @Html.DisplayNameFor(model => model.Descripcion)
        </dt>

        <dd>
            @Html.DisplayFor(model => model.Descripcion)
        </dd>

        <dt>
            @Html.DisplayNameFor(model => model.FechaLanzamiento)
        </dt>

        <dd>
              @Model.FechaLanzamiento.ToString("dd/MM/yyy")
        </dd>

        <dt>
            @Html.DisplayNameFor(model => model.Precio)
        </dt>

        <dd>
            @Html.DisplayFor(model => model.Precio)
        </dd>

        <dt>
            @Html.DisplayNameFor(model => model.Categorias)
        </dt>

        <dd>
            @Html.DisplayFor(model => model.Categorias)
        </dd>

    </dl>
</div>
<p>
    @Html.ActionLink("Editar", "Edit", new { partition = Model.PartitionKey,row = Model.RowKey }) |
    @Html.ActionLink("Volver", "Index")
</p>
Edit
@model EjemploTableStorage.Models.Videojuego

@{
    ViewBag.Title = "Edit";
}

<h2>Edit</h2>


@using (Html.BeginForm())
{
    @Html.AntiForgeryToken()

    <div class="form-horizontal">
        <h4>Videojuego</h4>
        <hr />
        @Html.ValidationSummary(true, "", new { @class = "text-danger" })

        <div class="form-group">
            @Html.LabelFor(model => model.Estudio, htmlAttributes: new { @class = "control-label col-md-2" })
            <div class="col-md-10">
                @Html.EditorFor(model => model.Estudio, new { htmlAttributes = new { @class = "form-control" } })
                @Html.ValidationMessageFor(model => model.Estudio, "", new { @class = "text-danger" })
            </div>
        </div>

        <div class="form-group">
            @Html.LabelFor(model => model.IdVideojuego, htmlAttributes: new { @class = "control-label col-md-2" })
            <div class="col-md-10">
                @Html.EditorFor(model => model.IdVideojuego, new { htmlAttributes = new { @class = "form-control" } })
                @Html.ValidationMessageFor(model => model.IdVideojuego, "", new { @class = "text-danger" })
            </div>
        </div>

        <div class="form-group">
            @Html.LabelFor(model => model.Nombre, htmlAttributes: new { @class = "control-label col-md-2" })
            <div class="col-md-10">
                @Html.EditorFor(model => model.Nombre, new { htmlAttributes = new { @class = "form-control" } })
                @Html.ValidationMessageFor(model => model.Nombre, "", new { @class = "text-danger" })
            </div>
        </div>

        <div class="form-group">
            @Html.LabelFor(model => model.Creador, htmlAttributes: new { @class = "control-label col-md-2" })
            <div class="col-md-10">
                @Html.EditorFor(model => model.Creador, new { htmlAttributes = new { @class = "form-control" } })
                @Html.ValidationMessageFor(model => model.Creador, "", new { @class = "text-danger" })
            </div>
        </div>

        <div class="form-group">
            @Html.LabelFor(model => model.Descripcion, htmlAttributes: new { @class = "control-label col-md-2" })
            <div class="col-md-10">
                @Html.EditorFor(model => model.Descripcion, new { htmlAttributes = new { @class = "form-control" } })
                @Html.ValidationMessageFor(model => model.Descripcion, "", new { @class = "text-danger" })
            </div>
        </div>

        <div class="form-group">
            @Html.LabelFor(model => model.FechaLanzamiento, htmlAttributes: new { @class = "control-label col-md-2" })
            <div class="col-md-10">
                @Html.EditorFor(model => model.FechaLanzamiento, new { htmlAttributes = new { @class = "form-control" } })
                @Html.ValidationMessageFor(model => model.FechaLanzamiento, "", new { @class = "text-danger" })
            </div>
        </div>

        <div class="form-group">
            @Html.LabelFor(model => model.Precio, htmlAttributes: new { @class = "control-label col-md-2" })
            <div class="col-md-10">
                @Html.EditorFor(model => model.Precio, new { htmlAttributes = new { @class = "form-control" } })
                @Html.ValidationMessageFor(model => model.Precio, "", new { @class = "text-danger" })
            </div>
        </div>

        <div class="form-group">
            @Html.LabelFor(model => model.Categorias, htmlAttributes: new { @class = "control-label col-md-2" })
            <div class="col-md-10">
                @Html.EditorFor(model => model.Categorias, new { htmlAttributes = new { @class = "form-control" } })
                @Html.ValidationMessageFor(model => model.Categorias, "", new { @class = "text-danger" })
            </div>
        </div>

        <div class="form-group">
            <div class="col-md-offset-2 col-md-10">
                <input type="submit" value="Save" class="btn btn-default" />
            </div>
        </div>
    </div>
}

<div>
    @Html.ActionLink("Volver", "Index")
</div>
Ya tendríamos todo preparado para probar nuestra aplicación.
Puntos importantes
Creo que los puntos más importantes para el desarrollo de la aplicación son:
- Entender para qué puede utilizarse este tipo de almacenamiento(NoSQL).
- Si no se está muy familiarizado con Portal de Azure, pueden surgir problemas a la hora de la creación de la cuenta de almacenamiento.
- La sintaxis de creación de la tabla.
Espero que os haya servido de ayuda y no olvidéis dejad un comentario para cualquier pregunta.
Autor/a: Daniel Pizarro Cuervo
Curso: Microsoft MCSA Web Applications + Microsoft MCSD App Builder + Xamarin
Centro: Tajamar
Año académico: 2018-2019
Enlace del Proyecto: Github.
Enlace del Video: Video