
Creación de notificaciones al finalizar temporizador en xamarin.
Este tutorial muestra cómo usar notificaciones locales en las aplicaciones de Xamarin.Android y crear un temporizador. Muestra los conceptos básicos de creación y publicación de una notificación local. Cuando el usuario introduce un tiempo para el temporizador y hace clic en iniciar, cuando el tiempo finaliza se lanza la notificación en el área de notificaciones.
Puesta a punto
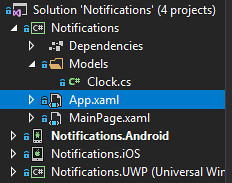
Para este proyecto, crearemos un nuevo proyecto de Movile App (Xamarin.Forms). En este caso, le he dado el nombre de notifications.

Dentro de notifications, crearemos una carpeta llamada Models, y en su interior añadiremos una clase llamada Clock, que usaremos para el temporizador.
Para poder realizar las notificaciones, añadiremos un plugin a notifications, llamado Xam.Plugins.Notifier, el cual nos permitirá implementar las mismas de una manera sencilla.

Para poder realizar la notificación en IOS, tendremos que añadir unas lineas de código para dar permiso a la aplicación a realizar dichas notificaciones. Las añadiremos dentro de AppDelegate.cs > FinishedLaunching
        public override bool FinishedLaunching(UIApplication app, NSDictionary options)
        {
            global::Xamarin.Forms.Forms.Init();
            LoadApplication(new App());
            if (UIDevice.CurrentDevice.CheckSystemVersion(10, 0))
            {
                // Ask the user for permission to get notifications on iOS 10.0+
                UNUserNotificationCenter.Current.RequestAuthorization(
                        UNAuthorizationOptions.Alert | UNAuthorizationOptions.Badge | UNAuthorizationOptions.Sound,
                        (approved, error) => { });
            }
            else if (UIDevice.CurrentDevice.CheckSystemVersion(8, 0))
            {
                // Ask the user for permission to get notifications on iOS 8.0+
                var settings = UIUserNotificationSettings.GetSettingsForTypes(
                        UIUserNotificationType.Alert | UIUserNotificationType.Badge | UIUserNotificationType.Sound,
                        new NSSet());
UIApplication.SharedApplication.RegisterUserNotificationSettings(settings);
            }
            return base.FinishedLaunching(app, options);
        }
Empecemos con el codigo
La clase clock.cs tendra esta estructura:
//AÑADIMOS INOTIFYPROPERTYCHANGED PARA SABER CUANDO VA CAMBIANDO EL RELOJ
public class Clock : INotifyPropertyChanged
    {
        public event PropertyChangedEventHandler PropertyChanged;
        public void RaisedPropertyChanged(String propiedad)
        {
            if (PropertyChanged != null)
            {
                PropertyChanged(this, new PropertyChangedEventArgs(propiedad));
            }
        }
        private int _Hora;
        public Clock(int hora)
        {
            this.Hora = hora;
                //INICIAMOS EL TIMER, FUNCIONANDO CADA SEGUNDO
                Device.StartTimer(TimeSpan.FromSeconds(1), () =>
                {
                    this.Hora--;
                //EN EL MOMENTO QUE LLEGUE A CERO LO PARAMOS
                    if (Hora == 0)
                    {
//GENERAMOS LA NOTIFICACION                        CrossLocalNotifications.Current.Show("Notificaciones", "Temporizador finalizado. Tiempo transcurrido: " + hora);
                        return false;
                    }
                    else
                    return true;
                });
        }
        public int Hora
        {
            get { return this._Hora; }
            set { this._Hora = value; RaisedPropertyChanged("Hora"); }
        }
    }
La pagina MainPage.xaml, que usaremos de pagina principal tendrá esta estructura:
<?xml version="1.0" encoding="utf-8" ?>
<ContentPage xmlns="http://xamarin.com/schemas/2014/forms"
             xmlns:x="http://schemas.microsoft.com/winfx/2009/xaml"
             xmlns:local="clr-namespace:Notifications"
             x:Class="Notifications.MainPage">
    <StackLayout>
        <Entry x:Name="entry"  HorizontalOptions="FillAndExpand" Placeholder="Introduce un tiempo" />
        <Label x:Name="hora"
                       FontSize="Large"
                       FontAttributes="Bold"
                       VerticalOptions="Start"
                       HorizontalOptions="CenterAndExpand"
                       Text="{Binding Hora}"/>
        <!-- Place new controls here -->
        <Button x:Name="btnNotification" Text="Iniciar temporizador" HorizontalOptions="Center" VerticalOptions="CenterAndExpand" />
    </StackLayout>
</ContentPage>
Como podemos ver, tenemos una entrada de texto, y un label que tiene un binding a la misma. A su vez, tenemos un botón para iniciar el temporizador.
Y MainPage.xaml.cs la siguiente:
public partial class MainPage : ContentPage
    {
        public Clock clock { get; set; }
        public MainPage()
        {
            InitializeComponent();
            btnNotification.Clicked += BtnNotification_Clicked;
        }
        void BtnNotification_Clicked(object sender, EventArgs e)
        {
            int tiempo = int.Parse(entry.Text);
            clock = new Clock(tiempo);
            BindingContext = clock;
        }
    }
Visualización de la aplicación
Con nuestro emulador de android iniciado, iniciaremos el proyecto, y esperaremos a su visualización en nuestro emulador. Deberíamos tener una pantalla parecida a la siguiente imagen:

Una vez introducido el numero de segundos para el temporizador, lo iniciaremos haciendo click en el botón. Nos mostrara un label en medio del teléfono, que ira cada segundo decreciendo hasta llegar a cero, así:

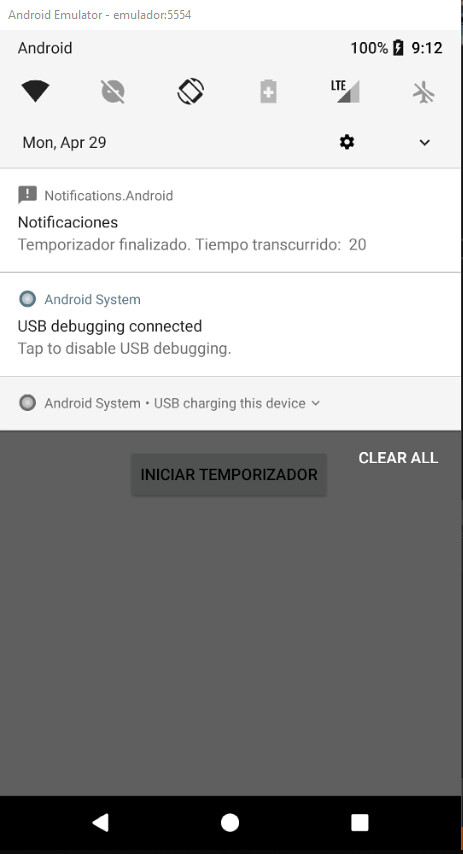
Al finalizar el temporizador, veremos que hemos recibido la siguiente notificación:
Y ya tendríamos la aplicación completada y probada.
Espero que les haya sido de ayuda, un saludo.
Autor/a: Javier Sánchez de Lago
Curso: Microsoft MCSA Web Applications + Microsoft MCSD App Builder + Xamarin
Centro: Tajamar
Año académico: 2018-2019
Código / recursos utilizados / Otros datos de interés: GitHub
Linkedin: Enlace